Wednesday, September 29, 2010

Easy as Apple Pie


In my mind, there are few things more lovely than hot apple pie. I like mine with a crisp crust and extra thick crumb topping, made just like the apple ranch where I used to work when I was a young teen.

That was the place I learned to work an old fashioned cash register (and had use math to make change), identify apples by variety and purpose (snacking, cooking, long storage etc.), and sweep the floor quickly (the owner once accused me of being a slow sweeper...as if!). I also made caramel apples and washed a lot of dishes. A lot of dishes. And apple pie goo is very, very sticky. On extra busy days, they let me help make the pies. Oh the pies! They were (and still are) the very best.

I've tried to pry the recipe from the cook's sticky little hands to no avail. So I was forced to try and replicate the recipe in my own kitchen over several trials. Oh darn. This one comes close. Very close. It may even be better...but don't tell the gals over at Bloomingcamp Ranch I said that.


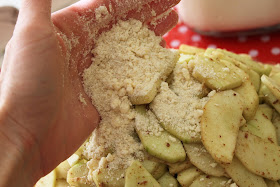


Farmstand Apple Pie

To be perfectly honest with you, this pie is a bit of work in the kitchen. But an old-fashioned pie like this is so worth the effort. When you are assembling it, it may seem like you won't be able to fit all the apples in the crust. Keep piling them on because they will shrink a lot. I had to bake my last pie for nearly 2 hours it was so big. Just check on it every 10 minutes or so after the first hour. The crust should be deeply golden brown and some juice will begin to bubble through when it is done.

Prep time: 45 minutes
Total time: 2 hours

Yield: 8 servings

Ingredients:

12 small-medium sized green apples, peeled, cored and cut into 1/4 inch slices
1/2 cup brown sugar
2 tablespoons apple cider vinegar
1 teaspoon cinnamon
1/2 teaspoon nutmeg
1 tablespoon flour

Single pie crust (I use this one from Marion Cunningham)

1 1/3 cups all-purpose flour
1/2 teaspoon salt
1/2 cup vegetable shortening
3 to 3 1/2 tablespoons ice water

To prepare the crust, combine flour and salt in a bowl; cut in shortening with a pastry blender or 2 knives until mixture resembles coarse meal. Sprinkle surface with ice water, 1 tablespoon at a time; toss with a fork until moist and crumbly. Press mixture gently into a 5-inch circle; wrap in plastic wrap. Chill 15 minutes. Flour dough lightly. Roll into circle between sheets of waxed paper on a work surface. Peel off top sheet. Flip into pie plate. Remove other sheet and press pastry to fit. Fold edge under. Flute and chill while you prepare the filling.

Topping
2 1/4 cups all-purpose flour
3/4 cup sugar
1/2 cup packed brown sugar
14 tablespoons cold butter, cut in cubes

Preparation:

1. Preheat oven to 375 degrees.

2. Make the filling. Toss together apples, brown sugar, vinegar, spices and flour in a large bowl. Set aside.

3. Make the topping. In a medium sized bowl, mix together the flour and sugar. Using a pastry cutter or your fingertips, blend in the butter, until coarse crumbs form.

4. Remove the crust from the fridge and pour apples into it. It will seem like a lot of apples for that size pie, but they shrink while baking. Carefully sprinkle the topping on the apple filling, covering the entire pie to the crust edges. Place pie on a parchment-lined baking sheet and bake for about one hour or until the topping is golden brown and the filling is bubbling. If necessary, cover the crust during the last few minutes of baking to prevent burning.

Sunday, September 26, 2010

The Big Chile


Today was ungodly hot. It was hot enough to kill people, literally. I am not made to live in weather like this, where the sun's so fierce the arid hills literally self-combust, as does my mood.

But remarkably, I held it together today...and my sweet husband was the one who volunteered to mind the grill, as we roasted the remaining chiles in our 25-pound box before they turned to mush. The heat radiating off the grill heated his belt buckle so much it burned his stomach. Ouch.

But he was glad to take one for the team. Glad because he knew that a juicy, and spicy chile burger was in his very near future. But first, we had to finish blackening the chiles. Then we wrapped them in plastic to loosen the skins. Finally we peeled them while they were almost cool enough to handle, on our kitchen table that we had protected with several layers of newspapers. Because of the vast quantity of chiles we had it took awhile. A long while. But I'm cautiously optimistic that we shall have enough chiles in our freezer to last us several months, leaving us just enough time without to get really, really hungry for our next batch. After all, absence makes the heart grow fonder, right?


The Perfect Hatch Chile Burger

Making a Hatch Chile burger is a simple and delicious way to use up your fresh chiles.

First roast, skin and peel as many NM chiles (or Anaheim or Poblano chiles) as burgers you want to make. The process is simple. Broil, grill or cook chile over an open flame until the skin is completely charred. Wrap in a cloth or plastic and set aside for a few minutes. Carefully tear off the skin and remove seeds and stem from the chile and set aside. Cook seasoned organic, grass finished ground beef over the grill to desired doneness. Top with roasted chile and pepper jack cheese (if desired). Serve on a toasted bun with sliced avocado and tomatoes...and beer. Lots of beer.

Saturday, September 25, 2010

An Apple Day


It was too hot to pick apples...too hot to do anything really. But we went anyway. And despite the heat, and the dust, and the crowds...and despite the fact that I nearly fainted from the elements (and scared the crap out of the kids with my tears...er, of joy), we had a terrific time!

Really.

And the best thing of all is that I have about 50 pounds of apples (and pears!) to do something with next week. (Yes I still have to roast all those chiles). And we have one and a half gallons of freshly squeezed cider. Did you know that it takes about 100 apples to make one gallon of cider? I didn't either. Well, maybe I used to, but I forgot. But it sure explains why apple cider is so, so good.

We picked a half bushel of Glen Seedlings, and another half bushel of Red Fujis, Galas, Astrachan, and Pears. The Glen Seedlings are for applesauce and pies...the rest are for snacking. It was almost a perfect day. It would have been if it was about 40 degrees cooler. Ah well, you can't have everything I guess, but I do have apples. Yes, I do!


After we got home, we threw some sausages on the grill and I whipped up a spicy and tart apple salsa to go with. Because I really can't get enough chiles. Ever. And it was pretty perfect too.

Do you go apple picking in the fall?


Apple Jalapeno Salsa


This salsa is an explosion of bright flavors. It's crisp and tart, sweet and sour and has a little kick from the jalapeno peppers too. Serve it over grilled sausages or chicken breasts, or even with chips.

Prep time: 10 minutes
Total time: 10 minutes
Yield: about 1 cup

Ingredients

1 medium tart, green apple, diced
1 jalapeno, seeded if desired and diced
1/2 red bell pepper, diced
3 green onions, thinly sliced
1/4 cup chopped cilantro
1 lime, juiced
1 tablespoon apple cider vinegar
2 teaspoons light olive oil
pinch of salt
2 pinches of raw sugar

Preparation:

1. Mix apple, jalapeno, bell pepper, green onion and cilantro in a medium bowl.

2. Add the lime juice, vinegar, oil, salt and sugar and toss to combine. Taste for seasoning and serve immediately, or refrigerate and use within one day.

Still At Market??....New Mexican Chiles


When I heard that the season for Hatch (New Mexican) chiles was perilously short this year due to searing summer heat, I freaked out. So much so that I bought a 25 pound box of them, just in the nick of time, it seems. Picked early Monday morning and shipped that same day, they arrived on Wednesday, filling my kitchen with the smoky, almost sultry fragrance of the scorched desert from which they came.

I roasted four and ate them immediately with greedy gulps on warmed corn tortillas, topped with a fat slice of cotija cheese. Now I just need to decide what to do with the remaining 400. Twenty-five pounds of chiles is a lot, in case you're wondering. A whole lot. Let the fun begin.

The pictures that follow are a mini tutorial on how to roast and skin fresh chiles. This method works well for Anaheim and Poblano chiles as well.


Wednesday, September 22, 2010

Happy Autumn!


Don't tell anyone, but I'm not crazy about figs...at least the fresh kind. They are good enough, I guess. But I usually find that I never use them up, though I have very good intentions when I buy them at the farmers' market. Quite honestly by the time I get around to using them, usually in a salad, they've gone moldy and turned to mush.

However, occasionally motivation strikes me, especially when I realize that the season is quickly drawing to a close. And mostly because I love fig jam. It is everything that fresh figs are not--tangy, sweet and complex. We use it to spread on sandwiches made with goat cheese and rustic bread. We serve it on a cheese plate, and I even think it would be delicious in thumbprint cookies.

Another great thing about fig jam is that it's surprisingly quick and easy to make. Because this recipe only makes 4 half pints, you don't need to drag out your huge water-bath canner either--your pasta pot will do fine. If you are new to canning, it really is easier than you think. Martha has some great tips here.


Fig Jam
Adapted from Put "Em Up

This sexy concoction is sticky, sweet and tangy--and definitely not child's play. Sure your kids can eat it if they want, but I'm willing to bet you won't want to share it! Spread it on a sandwich with smoked turkey and goat cheese, or spoon it over a hunk of aged farmhouse cheddar. Make extra to give as a gift....

Prep time: 15 minutes
Total time: Just over an hour
Yield: about 4 cups

Ingredients:

2 pounds fresh figs
1 cup water
1 cup sugar
1/4 cup lemon juice
1/2 cup balsamic vinegar

Preparation:

1. Sterilize 4 half pint jars in a pot of boiling water (or in a 200 degree oven) for 10 minutes, turn the heat to low and add the lids (it should no longer be boiling). Keep warm while you prepare the jam. Just before filling with jam, remove jars from the water and invert on a clean dishcloth to drain. Fill your canner (or pasta pot with insert) with water and bring to a boil.

2. Meanwhile, stem and quarter figs and place in a medium non-reactive stockpot with the water. Bring to a boil over high heat. Reduce heat, and simmer for 5 minutes to soften fruit.

3. Mash the figs using a potato masher, then add the sugar, lemon juice and vinegar. Return to boil, reduce heat and simmer, stirring occasionally for 30 minutes, or until thick and glossy. If you want to test to make sure it has gelled, place a plate in the freezer for 10 minutes and then drizzle some of the jam across it. It should set quickly.

4. When jam is ready, carefully ladle it into the hot sterilized jars using a canning funnel leaving 1/2 inch of headspace. Wipe rims clean, top with lids and loosely tighten bands.

5. Process in a pot of boiling water for 10 minutes. Turn off heat and let jars rest in the hot water for 5 minutes more. Remove from pot, using jar tongs and let sit on the counter for 24 hours. You will probably hear the "ping" from the lids much before this. Jars that are sealed properly (the lids will fit tightly and you won't be able to indent the top) can be stored in a cool pantry for a year or so. Any that did not seal, must be refrigerated and used within 3 weeks.

6. If you do not wish to process the jam, cool to room temperature and freeze or refrigerate and use within 3 weeks.

Monday, September 13, 2010

Pumpkins, Hooray!


So folks, I got a new camera, which has been good and bad--good for obvious reasons, and bad because I'm still trying to learn to work the darn thing. It has so many mega-pixels that Blogger can't handle the photos,and consequently, I've had many things I've wanted to share with you, but couldn't due to technical difficulties. Thankfully, I finally figured out how to make the necessary adjustments and so.....I'm baaaack!

And not a moment too soon, because apparently it's pumpkin season! Already? Seems early this year to me.

Speaking of pumpkin season, I don't know about you, but I was totally traumatized by last year's pumpkin shortage. I have one can left in my pantry that I've been hoarding since October just in case I was struck with the unstoppable urge to make pumpkin bread with chocolate chips. It was a minor comfort in an uncertain world, that I could have something that others could only dream of. That, and the fact that pumpkin was being auctioned off for big bucks on ebay meant I could sell it should our family come upon hard times...okay they weren't going for that much, but who would pay $30 for one can of pumpkin?!?

Someone who had an unstoppable urge to bake pumpkin bread with chocolate chips, that's who!

So imagine my surprise when I was at the market the other day and spied sugar pie pumpkins. I quickly put two in my cart, nearly giddy with the prospect of having even more pumpkin in my coffers, and feeling kind of smug, because surely canned pumpkin wasn't available yet--and who would go through the trouble to roast their own anyway besides freaks like me who like to do things the hard way? I could smell the pumpkin bread baking already....

Well, I rounded the corner and was met by a wall of--you guessed it!--canned pumpkin...canned organic pumpkin no less. There goes my emergency $$. Pumpkins are back, folks. We can all rest easy now. However, I didn't put those cute sugar pies back (mostly because I wanted to roast the seeds...), and I got 2 cups of delicious pumpkin puree out of each.

Some of which obviously went into a loaf of pumpkin bread with chocolate chips. The pumpkin bread I've been waiting to make all year. I wish I had been quicker with the camera because by the time I got to the kitchen all that was left was the heel. I turned my back for a second and even that was gone....just crumbs remained. That and the chocolate smears on the plate. Sigh. Next time, I'll double the recipe. Maybe you should too.


Roasted Sugar Pumpkins


Roasting pumpkins is much like roasting any other winter squash. Just make sure they are sugar pumpkins or pie pumpkins first (not carving pumpkins which lack flavor). Cut them in half, scoop out those seeds (which I recommend roasting after tossing with a little salt and melted butter), and place them face down on a baking sheet. Cover with foil and bake at 350 degrees for 1 1/2 hours. Scoop out the flesh, discard the skin, and mash the flesh until it is smooth. Sometimes pumpkin puree can be a bit watery. If it is, try draining it in a cheesecloth lined sieve for awhile.

Marion Cunningham's Pumpkin Bread
Adapted from Fanny Farmer Cookbook

This loaf is spicy and dense, but not overly sweet. It's a wonderful snack with hot coffee or tea, but would also be a fantastic dessert if topped with cream cheese frosting (or a dollop of sweetened whipped cream).

Prep time: 10 minutes
Total time: 1 hour, 10 minutes
Yield: 1 loaf

Ingredients:

1 1/2 cups flour
1/2 teaspoon salt
1 cup sugar
1 teaspoon baking soda
1 1/2 teaspoons of pumpkin pie spice (or 1 teaspoon cinnamon, 1/4 teaspoon allspice, 1/4 teaspoon nutmeg)
1 cup pumpkin puree
1/2 cup vegetable oil
2 extra large eggs, lightly beaten
1/4 cup water
1/2 cup semi-sweet chocolate chips

Preparation:

1. Preheat the oven to 350 degrees.
2. Whisk together the flour, salt, sugar, baking soda and spices in a large bowl.
3. Mix the pumpkin, oil, eggs and water in another medium bowl.
4. Add the wet ingredients to the dry and whisk only until just combined. Stir in the chocolate chips.
5. Pour into a greased standard-sized loaf pan and bake for 50-60 minutes, or until a toothpick inserted into the center of the bread comes out clean.
6. Turn out of the pan and cool on a rack.