Sunday, June 27, 2010

Space Odyssey: Meet Kohlrabi


This gorgeous slaw, came from a strange orb, that looks not unlike a UFO...but is even more bizarre because it sprouts tentacle-like arms from all sides. It tastes sort of like radishes, but it's not spicy, and sort of like broccoli stems, but it's not sulfurous, and sort of like cucumbers, but it's not watery, and sort of like jicama, but it's not starchy. It is cool, crisp, moist and quite delicious and just what you want to eat on a hot and sultry summer night... like last night, where the fog was so thick the sea was totally obscured, the trees were dripping water like it had just rained, and the low, the LOW was 70 degrees. Ugh.

Kohlrabi tastes good on its own, but it tastes even better when it's dressed up a bit. I decided to julienne it, along with some snap peas and spring onions. Julienne is just a fancy word for slicing it into matchstick pieces. I was lazy, so my matchsticks were big, but if you care about uniformity, use your mandoline slicer or julienne peeler. If you're in your less-than-fully-equipped summer kitchen, and lack certain tools, it's not hard to do it on your own. Peel the kohlrabi, slice it thinly, then stack it and slice it into small matchsticks. ( Works for potatoes too, if you're ever inclined to make French fries.)

The resulting salad, tossed in a ginger dressing was everything I could have hoped for....zingy, bright and refreshing. And I would absolutely make this again if I ever get another kohlrabi in our CSA basket or find one at the farmers' market. If not, the I might substitute cucumbers, and/or broccoli stems (slaw) for the kohlrabi. I think it would also be great with a handful of chopped peanuts tossed on top just before serving (we didn't have any). Luckily, the salad kept well too and we enjoyed the leftovers for lunch again today!


Asian Kohlrabi Slaw

Prep time: 20 minutes
Total time: 20 minutes
Yield: serves 4, with leftovers

Ingredients:

1 kohlrabi, peeled and julienned and cut into 2-inch pieces (sliced into matchsticks)
1/2 pound of snap peas, de-stringed and julienned
4 scallions, julienned and cut into 2-inch pieces
1 jalapeno pepper, seeded, de-veined and diced
1 handful of cilantro, chopped
1 thumb of ginger, peeled and grated
1/4 cup rice wine vinegar
2 tablespoons canola (or other plain tasting) oil
1 teaspoon sesame oil
1 teaspoon soy sauce
1 teaspoon sugar
Chopped salted peanuts (a handful), optional

Preparation:

1. Toss kohlrabi, snap peas, scallions, jalapeno and cilantro in a large bowl. Set aside.

2. In a smaller bowl, whisk ginger, vinegar, oils, soy sauce and sugar until combined.

3. Drizzle dressing over the kohlrabi mixture and toss well to coat thoroughly. Serve immediately, or chill until ready to eat. Top with peanuts (if using) just before serving.

Weekending


Summer afternoon - summer afternoon;
to me those have always been
the two most beautiful words in the English language.
~Henry James

Saturday, June 26, 2010

The Case of the Smuggled Tomatoes


The tomatoes to your left, were picked off my tomato vines in California with only their first blush of red, carefully tucked in my carry-on, and placed on the window sill here in Cape Cod to ripen. Do you have any idea how difficult it is to transport tomatoes in a bag onto an airplane? Well, it is! Not only are there heavy books and magazines to contend with...but also feet....and beverage carts....

Anyway, they made it, ripened beautifully and were tossed into a salad of arugula, corn, chicken and blue cheese earlier this week. And they were worth the effort to transport, because unlike backyard eggs, you really can tell the difference in flavor with homegrown tomatoes! The arugula came from the FM here in Bass River and the corn from Jersey (shhh)....It was a fantastic and simple summer meal. As all summer meals should be, no?


Arugula Salad with Corn, Tomatoes, and Blue Cheese
adapted from Everyday Food

There are so many things going on in this salad, I feel it needs minimal dressing. But if you like your salads more heavily coated, you may want to double the lemon and olive oil. This would make for a fantastic lunch or light dinner.

Prep time: 20 minutes
Total time: 20 minutes
Yield: serves 2ish

Ingredients:

1 bag of baby arugula
2 large tomatoes, sliced
2 ears of corn, steamed for 2-3 minutes until tender and sliced off the cob *
1/2 cup sliced red onion
2 cooked chicken breast halves, sliced
1/4 cup crumbled blue cheese
juice from one lemon
2 tablespoons olive oil
pinch of salt and pepper

Preparation:

1. Place arugula in a large salad bowl. Add in tomatoes, corn, red onion, chicken breast, and blue cheese.

2. In a separate small bowl, whisk together the lemon juice and olive oil until combined. Add a pinch of salt and pepper to taste.

3. Toss salad with dressing until lightly coated. Taste for seasoning and serve immediately.

*You can also try microwaving your shucked corn. Place it on a plate and cover it with a paper towel. Microwave it for about one minute per ear.

Friday, June 25, 2010

Farm to Table


Friends, it's on! Summer is here, and with that comes amazing things out of the garden. And everything, it seems, is on steroids this year. Here on the Cape, things usually get a slow start....but sunny weather and warm temperatures, coupled with a mild spring have made produce large and in charge. There are armfuls of lettuce, tomatoes the size of melons, squash (already!), and pea vines, 10 feet tall! It really is a sight to behold.

Luckily, not only do we have our own little garden out back, but we belong to a CSA (or community supported agriculture), where we get a fantastic assortment of produce that we pick up weekly from Seaweed and Codfish Herb Farm. Veronica, the owner/operator/farmer, is a total character, and the first time we met her, she was tending her farm barefoot wearing only shorts and a bra (it was a really hot day). Certainly comfortable among her many chickens, goats, ducks, vegetable beds (and in her own skin), she's one of the few farmers on Cape Cod who grow lettuces all summer, as well as many other crops. When you go to her farm, not only will she show you around so you can meet her many furry and feathered friends, she will take you out to the garden so you can get your pick of lettuce and veggies, which she pulls up and picks for you on the spot. Talk about farm to table!

This evening we picked up edible flowers, red lettuce, boston lettuce, lambs tongue lettuce, 2 pounds of snap peas, a dozen eggs, 3 zucchini, 2 not-quite-ripe tomatoes (her first), kale, cippolini onions, mint, beets (with greens attached) and an herb bundle, that had parsley with leaves so big, they looked like they came out of the Jurassic era.

So what does one do with all that fantastic produce from the CSA basket? Well, for starters, because there is little choice in what you get, you're forced to try things you never have (kohlrabi anyone?), and challenge yourself with new recipes to use up things you have been eating in (over)abundance (kale anyone?). It can be difficult to eat it all up before the next batch arrives....in fact, I still have a kohlrabi languishing in the fridge from last week. But sometime this weekend, I shall make salad or slaw!

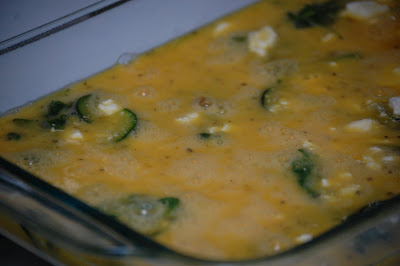
For tonight, we whipped up one dozen farm-fresh eggs and poured them over some of the freshly-picked veggies which were sauteed briefly in olive oil. It was a frittata of sorts (sounds so much fancier than baked eggs, doesn't it?), that was simple and perfect and even kind of elegant, especially when topped with a Jurassic parsley leaf. This could also double as an appetizer when cut into small squares and served at room temperature.


Farm Egg and Veggie Frittata


This simple yet elegant dish works well with just about any vegetable you have on hand. Try it with asparagus, or crook-neck squash, add crumbled cooked sausages or peppers...have fun and don't be afraid to experiment! Because eggs are the main ingredient, make sure they are the freshest possible.

Prep time: 15 minutes
Total time: 1 hour
Yield: serves 6 as a main course

Ingredients:

1 dozen eggs
1 teaspoon salt
1/2 teaspoon freshly ground pepper
1/2 cup heavy cream, half and half, or milk
1/2 cup crumbled feta or goat cheese
2 zucchini, sliced into half moons
1/2 cup chopped onion
2 large handfuls of arugula, spinach or chopped young chard
1 tablespoon olive oil
Minced parsley

Preparation:

1. Preheat the oven to 350 degrees and grease a 9x13 inch casserole dish. Set aside.

2. Beat the eggs, with salt, pepper and cream in a large mixing bowl until combined. Set aside.

3. Heat olive oil over medium heat in large skillet. Add zucchini, and onion and cook, stirring occasionally, until zucchini becomes tender and onions are translucent, about 5 minutes. Add the arugula (or whatever tender green you are using) and cook for 1-2 minutes more, or until it just begins to wilt.

4. Spread the veggies evenly out in the prepared 9x13 inch dish. Sprinkle over the cheese and then pour over the egg mixture.

5. Place in the oven and bake for 45 minutes, or until puffed slightly and cooked though in the middle.

6. Garnish with minced parsley and serve warm or at room temperature.

Sunday, June 20, 2010

Eat A Rainbow


So if you've been wondering where I've wandered off to, it's here....to what is quite possibly the most wonderful place on earth. Here, there is a rambling house, on the water, with a dock, and lots of kids, lots of fun, and lots of mosquitoes. Here we unwind, and do a lot of swimming, a lot of reading , a lot of cooking and a lot of sweeping up sand. There are outdoor showers under starry skies, grilled suppers, and fireflies flickering in the woods. And there is also a garden where we grow, among lots of lovely things, a literal rainbow.

Rainbow chard is just about as colorful as it is healthy and delicious. It's best prepared simply, like most veggies, and last night we quickly sauteed it with some garlic, lemon zest and olive oil. That's it. Summer meals should be like that, because who wants to spend hours in the hot kitchen when there is such a lovely view right out the back door?!


Sauteed Rainbow Chard


Chard is a mild green, and needs minimal cooking to become tender and delicious. With the exception of the bottom inch or so, the stem is edible.

Ingredients:

1 large bunch of rainbow chard, washed well, and sliced into bite sized pieces
1 tablespoon olive oil
1 clove of garlic, grated
Zest from one lemon
Pinch of salt and pepper

Preparation:

1. Drizzle olive oil in a large skillet. Add garlic and zest and heat over medium heat until garlic begins to color.

2. Add chard to the pan and using tongs, turn it so that it wilts evenly. Cook for about 2 minutes, or until wilted slightly throughout.

3. Remove from pan, and season with salt and pepper. Serve warm or at room temperature.

Monday, June 7, 2010

At Market....Apricots


To be perfectly honest, I don't really care for this fruit. Though they represent the literal first blush of beloved summer stone fruit, they are always a bit dense and slimy. And I don't particularly enjoy the flavor either. Peaches, plums and nectarines, I love in an obsessively passionate way. But as for apricots, I've never really been a fan.

That said, when these little, orange-hued orbs are bathed in a hot pot of sugar, sugar and more sugar, they become perfectly transformed into succulent and brilliantly flavored jam, quite possibly my favorite variety of all the jams I make.

The recipe is simple, but the flavor is complex...deep, musky and almond scented, in part due to the bitter almonds I toss into the mix. Did you know that almonds are a close cousin of stone fruits? If you've ever seen a raw almond, you'd realize that pretty quickly as they look much like a small, green and hairy apricot. And if you've ever given much consideration to the pits within apricots and peaches, you've probably noticed that they look strikingly like almonds in a shell. Have you ever tried to crack open the pit of an apricot? Inside are "bitter almonds" that when added to your jam, impart a slight almondyness. (A similar effect can be had with a splash of almond extract.)

I almost never use pectin when I'm preserving things. I have nothing against pectin really, I just think of it as a challenge to get things to jell without it. The best way to ensure that your jam will set is to use a combination of ripe and under ripe fruits because the firmer ones have more natural pectin. As your jam approaches readiness, it will begin to sputter a bit and when you stir the pot, you should be able to see the bottom peek through, depending on how large your batch is. You can also place a plate in the freezer and when you want to test if your jam is done, drizzle a bit over the frozen plate. It should set up quickly. A downside of not using boxed pectin, is that your jam will require a bit more sugar. Okay, a lot more sugar. But it's not like we're eating the whole jar in one sitting....or are we?

Put down the spoon and back away from the jam....


Apricot Jam

I always use my pasta cooker with strainer insert to water bathe smaller batches of jam because my large pot heats up my kitchen so much and takes forever to boil. I can fit about 6 jars at a time in my pasta cooker, so I need to boil the jars in two batches. Alternatively, you can simply invert the newly filled jars on your counter for about ten minutes to seal them. I have never tried this, but Chez Madelaine who wrote Gourmet Preserves recommends this easy method. Good canning tools to have on hand include jar tongs and a funnel which are usually available at your local hardware store.

Prep time: 10 minutes
Total time: about 1 hour and 45 minutes
Yield: 8 half pint jars

Ingredients:

4 pounds of apricots, pitted and quartered
7 cups of sugar
3 "bitter almonds" or 1/2 teaspoon almond extract
Juice from 1 lemon
vodka

Preparation:

1.Wash jam jars with hot, soapy water, dry carefully with a clean dishcloth, then place on a baking tray in a 180 degree oven to sterilize. Wash rings and jar tops and set aside.

2. Toss apricots with sugar in a large, heavy bottomed pot. Add lemon juice and bitter almonds or extract, and toss well to combine. To remove the bitter almonds from the pits of the apricots, simply crack the pits with a hammer (gently) and remove.

3. Turn stove to high and bring mixture to a boil, reduce heat to low and simmer for about one hour, or until jam sets when drizzled over a frozen plate. Make sure to skim the foam that rises to the top...save it to drizzle over ice cream. When the jam is done, it will have reduced by about half in the pot, and be sputtering. You may even be able to see the bottom of the pot when you stir. You need to stir frequently during this hour to ensure that the bottom does not scorch.

4. While jam is simmering, fill your pasta pot or hot water canner with water and bring to a boil.

5. When jam is set, remove jars from the oven and wipe rims and lids with vodka. Remove the bitter almonds from the jam. Using the funnel, carefully fill jars with jam, leaving about 1/2 inch head space in each jar. Wipe rims with vodka again to clean off any drips and top with the lids.

6. Screw on the bands loosely and using the tongs, carefully place them in the insert of you pasta pot or water canner. The water in the pot should cover the lids by about 1 inch. Vigorously boil the jars for 12 minutes, remove from water using the tongs and set on a clean dishcloth to cool. Each lid should "ping" and have a tight seal. If a jar doesn't seal, refrigerate after it is cool and eat within 2 weeks. All the sealed jars will last at least a year in your pantry.

Sunday, June 6, 2010

The Burning Mandarin


In my humble opinion, this quite possibly the best martini ever. The first sip is an intriguing combination of bright citrus followed by a slow burn, brought on by the serrano chiles that are muddled in the bottom of the cocktail shaker. We tried it at Katsuya, the uber fashionable, sushi restaurant in Hollywood, which is the kind of place where faces are tight, heels are high, and waists are tiny....and where a smallish dinner for two easily runs into the triple digits, especially when you add in the drinks. But a celebration was in order, and we lifted our glass to endings, to new beginnings, and most of all, to the prospect of an excellent summer.

Of course the next day, I hurried off to the store to buy the ingredients for this amazing cocktail. Though it requires a bit of prep (like most delicious things that come out of the kitchen), I assure you it is worth every small effort.

The Burning Mandarin Martini

inspired by Katsuya Restaurant

Prep time: 5 minutes
Total time: 5 minutes
Yield: 1 martini

Ingredients:

2 slices of serrano chile
1 1/2 ounces Absolute Mandarin
3/4 ounce lemon juice
1/2 ounce simple syrup
1/2 ounce orange juice
1/2 ounce cranberry juice

Preparation:

1. Muddle one slice of chile in the bottom of a cocktail shaker. Add vodka, lemon juice, simple syrup, orange juice, and cranberry juice, along with one large handful of ice.

2. Shake vigorously until well-chilled. Strain into a sugar-rimmed martini glass. Garnish with remaining chile slice.

Wednesday, June 2, 2010

Makin' Whoopie!


Have you made whoopie pies before? Surely you have at least eaten them....especially if you live in New England. Though Mainers and folks from Pennsylvania both argue that whoopie pies originated there, the general consensus is that it is a recipe from Amish country. According to tradition, Amish women would bake these to pack along with their husbands for lunch. When the hungry farmers discovered the treat in their lunch basket they would shout....all together now...."Whoopie!!"

Wherever their origination, these fluffy chocolate cakes, typically filled with vanilla cream frosting are something to behold and very worthy of their name. There are a couple of cookbooks out now that feature all different flavors of them, but I went with the traditional kind, and adapted the recipe from this one. They are tooth-achingly sweet, but in a good way, and a little goes a long way. I guarantee that with one bite of these, you'll be shouting, "Whoopie!" too!


Whoopie Pies

adapted from Epicurious

I measured out the cake dough using my regular ice cream scoop, but mini versions would be great too. Just make sure to adjust down the baking time by a few minutes.

Prep time: 30 minutes
Total time: 1 hour
Yield: about 8 desserts

Ingredients:

For cakes
2 cups all-purpose flour
1/2 cup good quality cocoa powder
1 1/4 teaspoons baking soda
1 teaspoon salt
1 cup well-shaken buttermilk
1 teaspoon vanilla
1 stick (1/2 cup) unsalted butter, softened
1 cup packed brown sugar
1 large egg

For filling
1 stick (1/2 cup) unsalted butter, softened
1 1/4-1 1/2 cups confectioners sugar
2 cups marshmallow cream such as Marshmallow Fluff (you will need 2 jars)
1 teaspoon vanilla

Preparation:

1. Preheat the oven to 350 degrees.

2. Mix flour, cocoa, baking soda and salt in a bowl and set aside.

3. In a large bowl, beat butter with sugar until light and fluffy, about 3 minutes. Add vanilla and egg and beat until smooth.

4. Mix in the flour and buttermilk, alternating in batches, starting and ending with the flour. Scrape down the sides of the bowl to incorporate all of the flour.

5. Spoon scant 1/4 cup mounds, 3 inches apart, on two greased cookie sheets. You should have 16 cakes. Bake for 11-13 minutes, rotating pans halfway through baking. The cakes are done when a toothpick inserted into the middle of the cakes comes out clean.

6. Remove from oven and cool on a wire rack. Fill with frosting.

7. While cakes are baking, you can prepare frosting. Beat butter in a large mixing bowl. Beat in the marshmallow cream, vanilla and powdered sugar and mix until smooth. Add enough powdered sugar so that the frosting isn't runny, but not overly stiff either. Cover with plastic and set aside until cakes are ready to fill.